
Create. Launch. Build.
A complete, practical walkthrough for creating your Solana token on Chippmunk, adding a Raydium CPMM liquidity pool, understanding your LP position, finding your token on trading screens, and building a launch the right way.
Before you start
Chippmunk is a non-custodial Solana token platform. You use your own Phantom wallet, review the transaction details, and sign transactions yourself. Chippmunk does not receive your private key or seed phrase.
Create your Solana token
Connect your Solana wallet and open Create Token from the navigation.
- Enter the token name. This is the full name shown for your project.
- Enter the token symbol. Keep it short and recognizable.
- Write the description. Explain what the project is and what users should know.
- Add optional project links. Chippmunk's launcher supports website, Telegram, Instagram and X/Twitter fields.
- Choose the total supply. The launcher validates the supply before the transaction is built.
- Choose decimals. The current launcher accepts 6 or 9 decimals.
- Upload your logo. PNG, JPEG and WebP are supported by the launcher; the logo is uploaded to Pinata/IPFS for token metadata.
- Review the launch fee. The current Chippmunk platform fee shown by the launcher is 0.02 SOL, separate from Solana network/rent costs.
- Let Chippmunk prepare the transaction. The server performs validation and the token transaction is built for Solana network.
- Review and sign in your wallet. Do not approve a transaction until the wallet, fee and transaction details are correct.
- Wait for confirmation. Chippmunk verifies the confirmed on-chain transaction and returns the new Mint address.
Check your token in Phantom
Once the token has been confirmed and the metadata has been indexed, Phantom can display the token name, symbol, balance and logo. Indexing can take a little time; refreshing the wallet may be necessary.
Make sure the same wallet used for the Chippmunk launch is active.
Look for the token by its symbol/name. If the logo is not visible immediately, allow the wallet/indexer time to refresh.
Chippmunk shows the on-chain Mint address. That address is what you use when looking up your token on explorers and trading screens.
Start a liquidity pool
Creating the token does not automatically create a trading pool. To make the token available through a liquidity pool, open Pool from the dashboard.
- Enter your token mint. Paste the Mint address of the token you created.
- Prepare the token side. Chippmunk currently initializes the pool with exactly 1,000,000,000 tokens. Your connected wallet must hold at least that amount.
- Choose the SOL amount. This supplies the SOL side of the SOL/token pair.
- Review the initial price. The token/SOL amounts determine the starting pool price.
- Review the costs. The current Chippmunk platform fee for pool creation is 0.01 SOL. The pool also requires the applicable Raydium CPMM creation cost and normal Solana network costs. Keep enough SOL in Phantom for the complete transaction.
- Connect your Solana wallet. The same connected wallet pays the pool costs and supplies the initial liquidity.
- Run the pool checks. Chippmunk checks the token and Solana network configuration before preparing the transaction.
- Review the transaction in Phantom and sign. The CPMM pool is then created on Solana.
Phantom may show a security warning
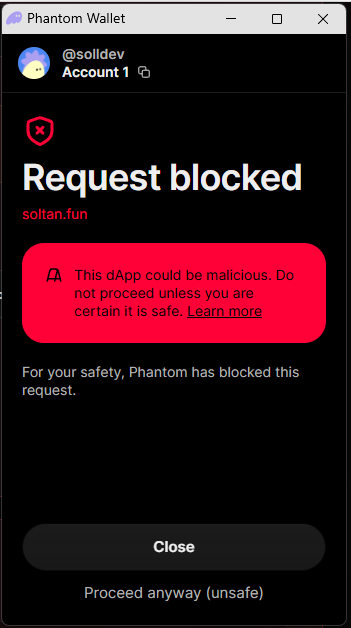
When you create a pool on Chippmunk, Phantom may sometimes display a screen such as the example below and block the request by default. This does not mean that the pool creation itself has failed.
If the transaction is the one you intentionally started on Chippmunk, carefully review the wallet, pool, token, amounts and transaction details in Phantom before signing. If everything matches what you intended, the transaction can still be completed from Phantom. Chippmunk is working to reduce these warnings and improve recognition of the platform.
The same type of Phantom warning can also appear when managing or removing liquidity. Never bypass a warning blindly and never sign a transaction you do not understand.
Understand the LP tokens you receive
When you provide the initial liquidity, the Raydium CPMM creates an LP mint and your wallet receives LP tokens representing your share of that pool. Raydium documents CPMM LP tokens as standard SPL tokens whose supply represents the total outstanding pool shares.
These LP tokens are not a second version of your own crypto coin. They represent your liquidity position. A wallet may show them as a token balance, and technically CPMM LP tokens are standard SPL tokens, but they are not normally something you buy and sell like your project token.
For your own pool, the easiest place to monitor the position is My Pools. Chippmunk reads the live LP balance from your wallet and displays the LP position associated with your registered pool.
Find and buy your own token
Chippmunk's current site does not act as the exchange itself. Once your pool is live, you can use a Solana screener or trading interface to find the token and then use your own connected wallet to make a purchase.
- Open My Token Info. Find your token card.
- Copy the Mint address. On the token card, copy the long address shown after Mint:. Do not copy the token name, symbol or pool address by mistake.
- Open a reputable Solana screener. For example, use Birdeye, DexScreener or Solscan.
- Paste the Mint address into the search field. Searching by the exact mint is safer than searching only by a similar token name.
- Confirm the pool. Check that the displayed mint, pool and token metadata match your Chippmunk token before trading.
- Connect Phantom to the third-party trading interface. Your Chippmunk account connection does not automatically authorize a third-party site; connect your wallet there separately.
- Review the swap. Check the token, amount, price impact and slippage before signing.
- Sign only in Phantom. The purchase is a separate blockchain transaction controlled by your wallet.
Burn your LP tokens
My Pools contains the LP Token beheren link for your registered pool. In the current Chippmunk implementation that link opens Sol Incinerator, a third-party Solana tool.
- Open My Pools and find your pool.
- Use LP Token beheren to open the linked third-party tool.
- Connect the wallet that holds your LP tokens.
- Identify the LP mint for the exact pool you created.
- Review the pool and LP position carefully before selecting a burn.
- Sign the burn transaction only after you are certain you want to permanently destroy the LP position.
For this reason, do not burn live LP tokens just because you want to remove liquidity. Burn is a deliberate, irreversible liquidity-lock action, not a normal withdrawal.
Open Sol Incinerator ↗Remove liquidity — and why you normally should not
If you use the Liquidity verwijderen link from My Pools, Chippmunk prepares a Raydium CPMM withdrawal. You choose 25%, 50%, 75% or 100% of the LP position. The withdrawal returns the proportional token and SOL amounts from the pool, subject to the live pool state and withdrawal slippage protection.
- Open My Pools.
- Select Liquidity verwijderen for the pool.
- Choose the percentage of your LP position.
- Review the expected token/SOL amounts.
- Review the current Chippmunk liquidity-removal platform fee of 0.05 SOL plus applicable network costs.
- Prepare the transaction.
- Read the complete transaction in Phantom and sign only if everything is correct.
Removing liquidity is different from burning LP. A withdrawal uses your LP position to redeem your share of the pool. Burning destroys the LP claim instead.
How to build a stronger Chippmunk launch
There is no official formula that guarantees a token will become successful. The safest “Chippmunk way” is to build a transparent project and let the market decide.
Make the token recognizable
Use a clear name, readable symbol, professional logo and honest description.
Set a sensible initial pool
Choose token/SOL amounts carefully because they establish the starting pool price and affect slippage and liquidity.
Be transparent
Publish the correct Mint and Pool addresses. Explain supply, liquidity and any LP decision openly.
Keep liquidity healthy
Healthy liquidity makes normal trading easier. Do not remove liquidity casually.
Build a real community
Use your website and legitimate social channels to explain the project rather than promising guaranteed profits.
Earn trust on-chain
Let users verify the Mint, pool, transactions and LP position independently on Solana explorers and market screens.
Automatic participation in Chippmunk Championships
Eligible Chippmunk tokens do not require a separate manual registration for the Championship. The current Championship system looks for active Chippmunk tokens with an active registered pool on Solana network.
The current Championship cycle is 6 days. At finalization, the system ranks eligible creator tokens by their highest observed market-cap estimate and awards points to the top three eligible creators, with the current point schedule of 1,000 points for #1, 500 for #2 and 250 for #3. The system also limits the final winners to one winning position per user in a cycle.
11. API 2.0 & developer integration
Chippmunk API 2.0 is the developer-facing, server-to-server interface for reading structured Chippmunk data and receiving signed event notifications. It is designed for integrations that need reliable programmatic access to Chippmunk token, pool, Registry and security information.
What the API is for
The API lets an external service or software integration request structured information from Chippmunk without giving that integration control over a Chippmunk account or a user's wallet. API 2.0 is intentionally read-oriented: external API consumers do not receive private keys, seed phrases, wallet-signing secrets or arbitrary transaction execution capabilities.
Who can use it?
You do not have to be the creator of a particular token or pool to read information that the API exposes. An integration can use publicly exposed Chippmunk data even when the API consumer did not create the tokens or pools being referenced. Access is authenticated with a Chippmunk API key and controlled by scopes.
What the API does not do
API 2.0 is not a token-creation API, trading API or wallet-signing API. The public v1 endpoints are read-only. They do not give an external API consumer the ability to create tokens, create or manage liquidity pools, sign wallet transactions, transfer funds or execute arbitrary blockchain transactions.
Authentication
API 2.0 uses Chippmunk sf_live_... API keys. Send the key in the HTTP Authorization header as a Bearer token.
sf_live_... key in browser JavaScript, public HTML, mobile application bundles, screenshots, public Git repositories or other client-side code that users can inspect.GET https://chippmunk.fun/api-v2/v1/tokensAuthorization: Bearer YOUR_CHIPPMUNK_API_KEYAvailable scopes
API keys use scopes so an integration can be limited to the data it actually needs.
Endpoint reference
Returns a paginated list of Chippmunk tokens. Use limit=1..100 and an opaque cursor for pagination.
Returns details for a specific token mint.
Returns automated risk indicators such as token-program type, mint/freeze authority status, Token-2022 extensions and concentration indicators. This is not a smart-contract audit and is not investment advice.
Returns pools associated with the specified token mint.
Returns a paginated pool list. You can use limit, cursor and mint filters.
Returns details for a specific pool address. Where available, the response can include public Raydium enrichment.
Returns public Token Registry records and supports pagination.
Returns the public Registry record for a token mint. Private Registry records are not exposed by the public read endpoint.
Returns daily request and error counters for the authenticated API key.
Pagination
List endpoints use opaque cursors. Treat the cursor as an implementation value: store it temporarily for the next request, but do not parse, modify or rely on its internal format. Start with a reasonable limit, process the returned records, then request the next page using the returned cursor when one is supplied.
Rate limits and responsible use
API 2.0 enforces a per-key rate limit of 120 requests per 60 seconds and also applies client-IP protection. Design your integration to respect HTTP 429 responses and retry with backoff instead of sending requests continuously.
- Cache data that does not need to be refreshed on every page view.
- Use pagination rather than repeatedly requesting the entire dataset.
- Use webhooks for supported change notifications when real-time updates are useful.
- Do not attempt to bypass rate limits by rotating keys, IP addresses or clients.
- Do not use the API to probe, scan, exploit or interfere with Chippmunk's systems.
Using the API in an integration
A safe architecture keeps the Chippmunk API key on your server. Your software or service sends requests from its protected backend to Chippmunk API 2.0 and then processes the returned data according to its own requirements.
Do not put the Chippmunk API key directly into a public JavaScript fetch call. If a browser can inspect the key, assume it is public and replace it.
Webhooks
Webhooks are useful when your application needs to react to changes without repeatedly polling the API. Supported events include token.created, token.updated, pool.created, pool.updated, registry.updated and security.checked.
Webhook deliveries use HTTPS and an HMAC-SHA256 signature. Your receiving server should calculate the expected signature over the exact raw request body and compare it using a constant-time comparison. Never trust an event only because the request reached your endpoint.
X-Chippmunk-Signature, reject invalid signatures, and make event handling idempotent so a retry cannot accidentally perform the same action twice.Using security results correctly
The Security endpoint is an automated risk-indicator tool. It can identify technical indicators such as active authorities, Token-2022 extensions and token-account concentration, but it does not prove that a project is safe, legitimate or profitable. Do not market a Chippmunk security grade as an audit, endorsement, guarantee or investment recommendation.
Rules for integrations using Chippmunk API 2.0
Attribution and presentation
If your software or service presents Chippmunk data to users, clearly identify Chippmunk as the source where practical and do not make the presentation misleading. Displaying Chippmunk data does not give your application permission to use Chippmunk branding in a way that implies endorsement, partnership or official status unless Chippmunk has expressly authorised that use.
Errors and production readiness
Handle normal HTTP failures such as authentication errors, insufficient scopes, invalid parameters, rate limiting and temporary upstream failures. Responses include an API version and request identifier so a developer can diagnose problems without exposing server internals.
Quick integration checklist
- Obtain an active Chippmunk API key with only the scopes your application needs.
- Store the key in your server-side secret configuration.
- Call the required endpoint with
Authorization: Bearer .... - Validate HTTP status codes and the JSON success/error structure.
- Implement pagination and caching for list endpoints.
- Respect the 120-request-per-minute API-key limit and back off after 429 responses.
- If using webhooks, verify the HMAC signature and make processing idempotent.
- Do not expose private API credentials or Chippmunk secrets to your users.
- Review the current API documentation before deploying production integrations.
Final safety checklist
Every on-chain action must be understood and approved by you. No guide can remove blockchain, market, wallet, smart-contract/program, regulatory or financial risk.